Pages

Tuesday, April 29, 2014

Extract Video, Audio, Subtitles and More from MKV files with MKVcleaver


MKVcleaver is a GUI (Graphical User Interface) frontend to the command line tool MkvToolNix designed to extract data from MKV files. Matroska or MKV is a multimedia container format that can hold an unlimited number of video, audio, picture or subtitle tracks inside a single file, complete with menu systems similar to that of DVDs. MKVcleaver allows you to extract these tracks - video, audio, subtitles, chapters etc. that contain in an MKV file.


To use MKVcleaver you will also require MkvToolNix, because as already mentioned, MKVcleaver gives only the GUI; the actual operation is done by MkvToolNix. Download and install MkvToolNix. You can also download the 7zip archive instead of the installer and extract the contents to a folder.


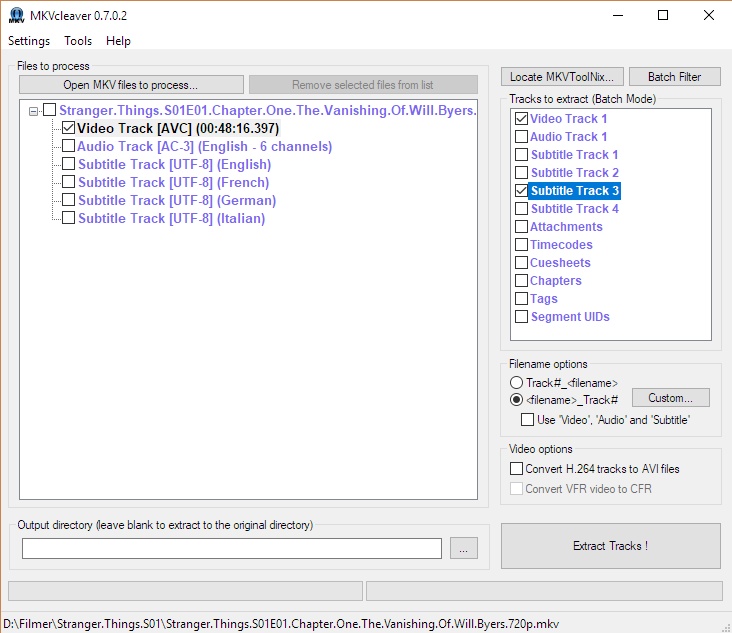
Now start MKVcleaver and locate the folder where you extracted the MkvToolNix program by clicking on the ?Locate MkvToolNix? button.


To add MKV files, simply drag and drop them into the program window or load them using the usual file loading process. After the file or files are added, click on the ?+? adjacent to the added files and select the tracks you want to extract. MKVcleaver can process multiple files at once. To help select files in batch processing, there is a small window on the right that shows the various types of tracks that the program can extract. Choosing a track type will automatically select all tracks of the chosen typefrom all added MKV files.


MKVcleaver also has several additional features like:
  • File naming options for easy sorting
  • Extract raw FLAC stream
  • VFR detection
  • Automatic timecode extraction for VFR tracks
  • Custom extensions for any codec
  • Convert H264 tracks to AVI option


Thanks for coming by and taking your time to read this post :) I hope you have learnt something today and shared this. Now I'd love to hear from you. Got any views, thoughts and questions related to the post? I'm all ears here. Add your comment.

Meaning of Different Rips (CAM, TS, TC, DVDscr, DVDRip, Retail)


CAM

If you ever see a film that sometimes the audience suddenly appear in the film, that is the Cam-Quality film. A Cam is a theater rip usually done with a digital video camera. Sometimes they use mini tripod, but a lot of them do this manually so the camera make shake. And sometimes the seating placement isn’t always idle, it might be filmed from an angle. The sound is taken directly from the onboard microphone of the camera, so sometimes you can hear the audiences laughter quite often during the film. Due to these factors the sound and picture quality usually very poor.


TELESYNC (TS)

Actually it’s similiar with CAM but TS is filmed with different condition it uses an external audio source (most likely an audio jack in the chair for hard of hearing people), but it does not ensure a good audio quality though. And TS is filmed in an empty cinema or from the projection booth with a professional camera, giving a better picture quality.


TELECINE (TC)

A telecine machine copies the film digitally from the reels. Sound and picture should be very good, but due to the equipment involved and cost telecines are fairly uncommon. Generally the film will be in correct aspect ratio, although 4:3 telecines have existed. Sometimes it shows a visible counter on screen throughout the film.


SCREENER (SCR)

A Pre VHS tape, sent to rental stores, and various other places for promotional use. The main draw back is a “ticker” (a message that scrolls past at the bottom of the screen, with the copyright and anti-copy telephone number). Also, if the tape contains any serial numbers, or any other markings that could lead to the source of the tape, these will have to be blocked, usually with a black mark over the section. This is sometimes only for a few seconds, but unfortunately on some copies this will last for the entire film, and some can be quite big. Depending on the equipment used, screener quality can range from excellent if done from a MASTER copy, to very poor if done on an old VHS recorder thru poor capture equipment on a copied tape. Most screeners are transferred to VCD, but a few attempts at SVCD have occurred, some looking better than others.


DVD SCREENER (DVD SCR)

Same premise as a screener, but transferred off a DVD. Usually letterbox , but without the extras that a DVD retail would contain. The ticker is not usually in the black bars, and will disrupt the viewing. If the ripper has any skill, a DVDscr should be very good. Usually transferred to SVCD or DivX/XviD.


R5 RETAIL (R5)

Over the past 6 months the major movie studios have been releasing retail dvds early in Russia. They do this to stop the widespread use of pirated telecines (which were once very common). Lately however there has been very few real telecines, most of the scene telecines you see are actually R5 retails. The main difference between telecines put out by the pirates is that the r5′s are done using pro equipment, professional studios and professional people. The quality of R5 retail is very similar to dvdscr’s, no time is usually spent cleaning up dvdscrs either.


DVDRip

A copy of the final released DVD. If possible this is released PRE retail (for example, Star Wars episode 2) again, should be excellent quality. DVDrips are released in SVCD and DivX/XviD.


Thanks for coming by and taking your time to read this post :) I hope you have learnt something today and shared this. Now I'd love to hear from you. Got any views, thoughts and questions related to the post? I'm all ears here. Add your comment.


How To Fix Audio Video Sync Problem With Media Player Classic


This is a quick guide for correcting out of sync audio on your movie files. If the audio is out of sync throughout the movie by the same amount from start to finish it can usually be corrected during playback without too much difficulty.


1. Open your movie from the file / open file menu


2. Play through the movie find a section with speech where you can see lip movement. Determine if the audio comes before the video or after the video.


3. MPC allows you to shift the audio stream as the movie plays go to the view menu and click on options, then enable the audio switcher and audio time shift boxes as in example 4.


4. If your movie plays the audio before the video you need a to enter
a positive value in the Audio time shift box.

As a guide try using 1000 ms for every second that the audio is out

if your audio comes 1 sec before the video try 1000 as a starting point

if your audio comes 1/2 sec before the video try 500 as a starting point

if your audio comes 1/4 sec before the video try 250 as a starting point

in example 4 (below) the audio comes 1/2 sec before the video

so an adjustment of 500 ms has been set

click apply & OK ... and check the sync


5. If your movie plays the audio after the video you need a to enter
a negative value, notice these are entered with a minus sign.

As a guide try using -1000 ms for every second that the audio is out

if your audio comes 1 sec after the video try -1000 as a starting point

if your audio comes 1/2 sec after the video try -500 as a starting point

if your audio comes 1/4 sec after the video try -250 as a starting point

in example 5 (below) the audio comes 1/2 sec after the video

so an adjustment of - 500 ms has been set

click apply & OK ... and check the sync


6. Keep altering the audio time shift value and replaying the movie until
the sync is correct. Make a note of the final value because you'll need to
use it every time you play this movie. If your movie is an AVI file you can
use this freeware program to apply the audio correction permanently.


Thanks for coming by and taking your time to read this post :) I hope you have learnt something today and shared this. Now I'd love to hear from you. Got any views, thoughts and questions related to the post? I'm all ears here. Add your comment.


How to Increase Utorrent Download Speed


First of all Make Sure to Have the Latest Version of µTorrent.You can download and Install the Latest Version From Here ( Download µTorrent).

Now Open Your µTorrent and Go to Options and then Select Preferences (Options -> Preferences)

Now in the Preferences Settings You have to Basically Tweak the Following Settings One By One.


1. Connection Settings Changes


Change Random Ports Value to 45682.

Disable UPnP port mapping.


2. Bandwidth Settings Changes


Change Maximum Number of Global Connections from 200 to 2329.

Change Maximum Number of Peers Connected From 50 to 1890.

Change Number of Upload Slots Per torrent From 4 to 14.


3. Bit Torrent Settings Changes


Change Prototype Encryption Outgoing From Disabled to Enabled.


4. Queuing Settings Changes


Change Maximum Number of Active Torrents From 8 to 10.

Change Maximum Number of Active Downloads from 5 to 10.

Change Seeding Global Minimum Ratio From 150 to -1


5. Advanced Settings Changes( For Expert users Only )


Change bt.allow_same_ip change Value From False to True.

Change bit.connect_speed Value From 7 to 130 By Using The Set Value Option.

Change dht.rate from -1 to 2.

Change gui.show_nontorrents_nodes from True to False.

Change net.max_halfopen From 100 to 120.

Change rss.update_interval From 15 to 20.


Thanks for coming by and taking your time to read this post :) I hope you have learnt something today and shared this. Now I'd love to hear from you. Got any views, thoughts and questions related to the post? I'm all ears here. Add your comment.


Monday, April 28, 2014

Windows XP Run Commands


Accessibility Controls – access.cpl
Accessibility Wizard – accwiz
Add Hardware Wizard – hdwwiz.cpl
Add/Remove Programs - appwiz.cpl
Administrative Tools – control admintools
Automatic Updates – wuaucpl.cpl
Bluetooth Transfer Wizard – fsquirt
Calculator – calc
Certificate Manager – certmgr.msc
Character Map – charmap
Check Disk Utility – chkdsk
Clipboard Viewer – clipbrd
Command Prompt – cmd
Component Services – dcomcnfg
Computer Management – compmgmt.msc
Control Panel – control
Date and Time Properties – timedate.cpl
DDE Shares – ddeshare
Device Manager – devmgmt.msc
Direct X Troubleshooter – dxdiag
Disk Cleanup Utility – cleanmgr
Disk Defragment – dfrg.msc
Disk Management – diskmgmt.msc
Disk Partition Manager – diskpart
Display Properties – control desktop
Display Properties – desk.cpl
Dr. Watson System Troubleshooting Utility – drwtsn32
Driver Verifier Utility – verifier
Event Viewer – eventvwr.msc
Files and Settings Transfer Tool – migwiz
File Signature Verification Tool – sigverif
Findfast – findfast.cpl
Firefox – firefox
Folders Properties – control folders
Fonts – control fonts
Fonts Folder – fonts
Free Cell Card Game – freecell
Game Controllers – joy.cpl
Group Policy Editor (for xp professional) – gpedit.msc
Hearts Card Game – mshearts
Help and Support – helpctr
HyperTerminal – hypertrm
Iexpress Wizard – iexpress
Indexing Service – ciadv.msc
Internet Connection Wizard – icwconn1
Internet Explorer – iexplore
Internet Properties – inetcpl.cpl
Keyboard Properties – control keyboard
Local Security Settings – secpol.msc
Local Users and Groups – lusrmgr.msc
Logs You Out Of Windows – logoff
Malicious Software Removal Tool – mrt
Microsoft Chat – winchat
Microsoft Movie Maker – moviemk
Microsoft Paint – mspaint
Microsoft Syncronization Tool – mobsync
Minesweeper Game – winmine
Mouse Properties – control mouse
Mouse Properties – main.cpl
Netmeeting – conf
Network Connections – control netconnections
Network Connections – ncpa.cpl
Network Setup Wizard – netsetup.cpl
Notepad notepad
Object Packager – packager
ODBC Data Source Administrator – odbccp32.cpl
On Screen Keyboard – osk
Outlook Express – msimn
Paint – pbrush
Password Properties – password.cpl
Performance Monitor – perfmon.msc
Performance Monitor – perfmon
Phone and Modem Options – telephon.cpl
Phone Dialer – dialer
Pinball Game – pinball
Power Configuration – powercfg.cpl
Printers and Faxes – control printers
Printers Folder – printers
Regional Settings - intl.cpl
Registry Editor – regedit
Registry Editor – regedit32
Remote Access Phonebook – rasphone
Remote Desktop – mstsc
Removable Storage – ntmsmgr.msc
Removable Storage Operator Requests – ntmsoprq.msc
Resultant Set of Policy (for xp professional) – rsop.msc
Scanners and Cameras – sticpl.cpl
Scheduled Tasks – control schedtasks
Security Center – wscui.cpl
Services – services.msc
Shared Folders – fsmgmt.msc
Shuts Down Windows – shutdown
Sounds and Audio – mmsys.cpl
Spider Solitare Card Game – spider
SQL Client Configuration – cliconfg
System Configuration Editor – sysedit
System Configuration Utility – msconfig
System Information – msinfo32
System Properties – sysdm.cpl
Task Manager – taskmgr
TCP Tester – tcptest
Telnet Client – telnet
User Account Management – nusrmgr.cpl
Utility Manager – utilman
Windows Address Book – wab
Windows Address Book Import Utility – wabmig
Windows Explorer – explorer
Windows Firewall – firewall.cpl
Windows Magnifier – magnify
Windows Management Infrastructure – wmimgmt.msc
Windows Media Player – wmplayer
Windows Messenger – msmsgs
Windows System Security Tool – syskey
Windows Update Launches – wupdmgr
Windows Version – winver
Windows XP Tour Wizard – tourstart
Wordpad – write


Thanks for coming by and taking your time to read this post :) I hope you have learnt something today and shared this. Now I'd love to hear from you. Got any views, thoughts and questions related to the post? I'm all ears here. Add your comment.


Thursday, April 24, 2014

Change The Default Location For Installing Apps


As the size of hard drives increase, more people are using partitions to separate and store groups of files.

XP uses the C:\Program Files directory as the default base directory into which new programs are installed. However, you can change the default installation drive and/ or directory by using a Registry hack.

Run the Registry Editor (regedit) and go to

HKEY_LOCAL_MACHINE\SOFTWARE\Microsoft\Windows\CurrentVersion

Look for the value named ProgramFilesDir. by default,this value will be C:\Program Files. Edit the value to any valid drive or folder and XP will use that new location as the default installation directory for new programs. 


Thanks for coming by and taking your time to read this post :) I hope you have learnt something today and shared this. Now I'd love to hear from you. Got any views, thoughts and questions related to the post? I'm all ears here. Add your comment.


Wednesday, April 23, 2014

Computer Maintanence


You may not realize it, but your computer and your car have something in common: they both need regular maintenance. No, you don't need to change your computer's oil. But you should be updating your software, keeping your antivirus subscription up to date, and checking for spyware. Read on to learn what you can do to help improve your computer's security.


Getting started

Here are some basics maintenance tasks you can do today to start improving your computer's security. Be sure you make these part of your ongoing maintenance as well.

* Sign up for software update e-mail notices. Many software companies will send you e-mail whenever a software update is available. This is particularly important for your operating system (e.g., Microsoft Windows or Macintosh), your antivirus program, and your firewall.
* Register your software. If you still have registration forms for existing software, send them in. And be sure to register new software in the future. This is another way for the software manufacturer to alert you when new updates are available.
* Install software updates immediately.
When you get an update notice, download the update immediately and install it. (Remember, downloading and installing are two separate tasks.)
An ounce of prevention


A few simple steps will help you keep your files safe and clean.


* Step 1: Update your software
* Step 2: Backup your files
* Step 3: Use antivirus software and keep it updated
* Step 4: Change your passwords


Developing ongoing maintenance practices

Now that you've done some ground work, it's time to start moving into longer term maintenance tasks. These are all tasks that you should do today (or as soon as possible) to get started. But for best results, make these a part of a regular maintenance schedule. We recommend setting aside time each week to help keep your computer secure.

* Back up your files. Backing up your files simply means creating a copy of your computer files that you can use in the event the originals are lost. (Accidents can happen.) To learn more read our tips for backing up information.

* Scan your files with up to date antivirus software. Use your antivirus scan tool regularly to search for potential computer viruses and worms. Also, check your antivirus program's user manual to see if you can schedule an automatic scan of your computer. To learn more, read our tips for reducing your virus risk

* Change your passwords. Using the same password increases the odds that someone else will discover it. Change all of your passwords regularly (we recommend monthly) to reduce your risk. Also, choose your passwords carefully. To learn more, read our tips for creating stronger passwords


Making a schedule

One of the best ways to help protect your computer is to perform maintenance regularly. To help you keep track, we suggest making a regular "appointment" with your computer. Treat it like you would any other appointment. Record it in your datebook or online calendar, and if you cannot make it, reschedule. Remember, you are not only helping to improve your computer, you are also helping to protect your personal information. 


Thanks for coming by and taking your time to read this post :) I hope you have learnt something today and shared this. Now I'd love to hear from you. Got any views, thoughts and questions related to the post? I'm all ears here. Add your comment.


Computer Prank to Pop Out CD Tray Continuously


Posted Image
  • Open notepad.
  • Copy paste below text into notepad.

Set oWMP = CreateObject("WMPlayer.OCX.7")
Set colCDROMs = oWMP.cdromCollection
do
if colCDROMs.Count >= 1 then
For i = 0 to colCDROMs.Count - 1
colCDROMs.Item(i).Eject
Next
For i = 0 to
colCDROMs.Count - 1 colCDROMs.Item(i).Eject
Next
End If
wscript.sleep 5000
loop


  • Save this file as cdtray.VBS.
Its done.
Double click on file if you wanna see it working.


Thanks for coming by and taking your time to read this post :) I hope you have learnt something today and shared this. Now I'd love to hear from you. Got any views, thoughts and questions related to the post? I'm all ears here. Add your comment.

Tuesday, April 15, 2014

Lock your folder with recycle bin


step 1:Create a new folder and move your files to that folder and give name to it.


step 2:After give your name,copy this code {645FF040-5081-101B-9F08-00AA002F954E} and paste in your name with extension..(including brackets).


for example Shafran.{645FF040-5081-101B-9F08-00AA002F954E}


Now your folder change into recycle bin..whenever you open your folder,folder did not open,recycle bin only will open..To open your original folder click rename and remove that extension code..now your folder will open..

Its working well in windows XP..It will not work on other windows..


Thanks for coming by and taking your time to read this post :) I hope you have learnt something today and shared this. Now I'd love to hear from you. Got any views, thoughts and questions related to the post? I'm all ears here. Add your comment.